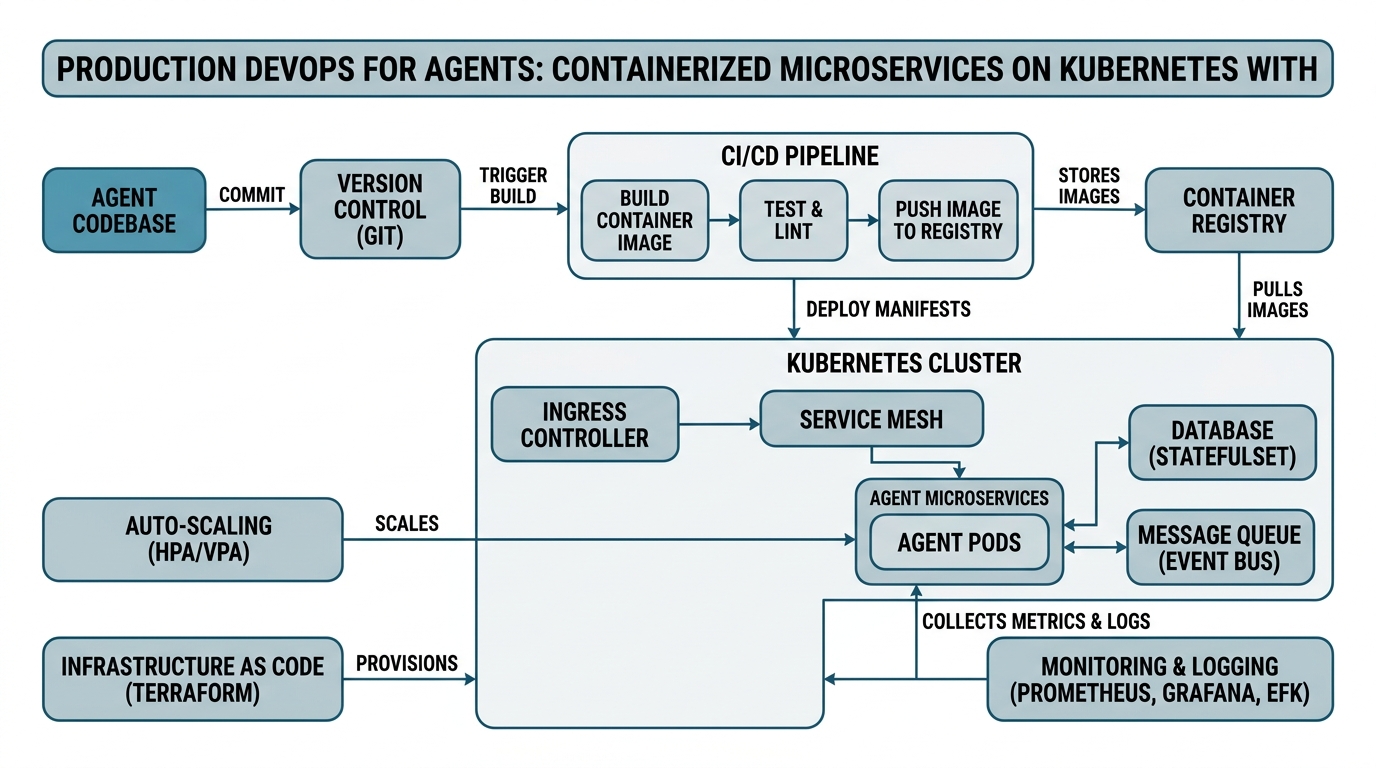
Production DevOps for Agents: Containerized Microservices on Kubernetes with Helm & LangFuse
You’ve built an AI agent that works beautifully on your laptop. Now you need to run it in production — where crashes, traffic spikes, and version conflicts turn your prototype into a nightmare. This tutorial demystifies the production DevOps stack that keeps agent systems running reliably at scale.
You’ll learn exactly how Production DevOps transforms messy agent code into Containerized Microservices that run on Kubernetes. We’ll cover Docker Images as your deployment units, Helm Charts for configuration management, CI/CD Pipelines for automated updates, and Autoscaling for handling variable traffic — all tied together with LangFuse for observability. Every concept gets a plain-English definition, a concrete analogy, and an annotated code example, so whether you have six months or six years of experience, you’ll walk away with practical knowledge you can apply immediately.
Production DevOps: The Factory Floor for Your Agents
Production DevOps is the practice of developing and operating software with the same rigor and automation in production that you use during development. Think of it as the difference between baking a single perfect cake at home (your laptop) and running a commercial bakery that produces hundreds of cakes daily, each consistent in quality, regardless of who bakes it or when.
Under the hood, Production DevOps automates every step between writing code and running it in production — building, testing, deploying, monitoring, and rolling back. It uses infrastructure-as-code (IaC) to define environments declaratively, so you can version, test, and reproduce them like application code.
The key insight most tutorials skip: Production DevOps isn’t just about automation — it’s about reducing the time between finding a bug and deploying a fix. For agent systems, where hallucinated responses can cascade into real-world damage, this speed is non-negotiable.
Containerized Microservices: Your Agent, One Job at a Time
Containerized Microservices break your agent system into small, independent services — each handling one specific function — and package each with everything it needs to run (code, dependencies, configuration) into a container.
Imagine a restaurant kitchen. Instead of one chef doing everything, you have a dedicated pastry station, a grill station, and a prep station. Each station has its own tools and ingredients, and you can replace or upgrade a station without shutting down the whole kitchen. Containerized microservices work the same way — your LLM inference service, your evaluation pipeline, and your logging service all run independently, each in its own container.
Here’s a practical example — a microservice that evaluates agent responses using LangFuse:
# evaluation_service.py — a standalone microservice
from flask import Flask, request, jsonify
from langfuse import LangFuse

app = Flask(__name__)
langfuse = LangFuse()

@app.route('/evaluate', methods=['POST'])
def evaluate_response():
    """
    Evaluate an agent response and log to LangFuse.
    This runs as its own containerized service.
    """
    data = request.get_json()
    response_text = data.get('response')
    conversation_id = data.get('conversation_id')

    # Log for observability
    langfuse.trace(
        name="response_evaluation",
        input=response_text,
        metadata={"source": "evaluation_service"}
    )

    score = len(response_text.split())  # Simple heuristic
    return jsonify({"score": score, "status": "evaluated"})

if __name__ == '__main__':
    app.run(port=5002)
The gotcha: microservices add network latency and complexity. Each service call has overhead, and suddenly you’re debugging distributed failures. Service meshes (like Istio) help, but they’re overkill for simple agent systems. Start with 2-3 services and split only when your system explicitly needs it.
Kubernetes: Your Container Orchestra Conductor
Kubernetes (often shortened to K8s) is an open-source platform that automates deploying, scaling, and managing containerized applications. If containers are individual musicians, Kubernetes is the conductor who tells them when to play, when to rest, and when to make room for more musicians.
Under the hood, Kubernetes tracks the “desired state” of your system. You declare “I want three replicas of my evaluation service running,” and Kubernetes constantly works to make reality match that declaration. If a container crashes, Kubernetes replaces it. If traffic spikes, it spins up more copies.
Here’s a minimal deployment manifest:
apiVersion: apps/v1
kind: Deployment
metadata:
  name: evaluation-service
spec:
  replicas: 3  # Desired number of running copies
  selector:
    matchLabels:
      app: evaluation
  template:
    spec:
      containers:
      - name: evaluator
        image: myregistry/evaluation-service:v1.2
        ports:
        - containerPort: 5002
        resources:
          requests:
            memory: "256Mi"
            cpu: "250m"
          limits:
            memory: "512Mi"
            cpu: "500m"
The non-obvious insight: Kubernetes makes it easy to overprovision resources. Setting requests too high wastes cluster capacity; setting limits too low causes throttling. Always test with realistic traffic patterns — ideally using a shadow deployment that mirrors production traffic — before finalizing resource specs.
Docker Images: Your Application in a Box
Docker Images are lightweight, standalone, executable packages that include everything needed to run a piece of software: code, runtime, system tools, libraries, and settings. Think of it as a shipping container — it has standardized dimensions and interfaces, so it fits on any ship (Kubernetes cluster) regardless of what’s inside.
Under the hood, a Docker Image builds in layers. Each instruction in your Dockerfile creates a new layer, and Docker caches these layers for efficiency. This architecture means you can update your code without rebuilding the entire base operating system.
Here’s a Dockerfile for our evaluation service:
# Dockerfile — defines how the image is built
FROM python:3.11-slim  # Base layer: Python runtime

WORKDIR /app

# Copy requirements first for layer caching
COPY requirements.txt .
RUN pip install --no-cache-dir -r requirements.txt

# Copy the application code
COPY evaluation_service.py .

EXPOSE 5002

CMD ["python", "evaluation_service.py"]
The edge case: building images with CI/CD (coming next) often produces massive images because every build starts from scratch. Use multi-stage builds to keep images small — your first stage installs all build dependencies, the final stage copies only the runtime artifacts.
CI/CD Pipelines: The Assembly Line for Your Software
CI/CD Pipelines (Continuous Integration/Continuous Deployment) automate the process of building, testing, and deploying your code changes. Think of it as an automated assembly line — you push code to GitHub, and the pipeline automatically builds your Docker image, runs tests, and deploys it to Kubernetes.
Under the hood, a CI/CD pipeline runs in stages. Each stage takes input from the previous stage and produces an output. If any stage fails (tests don’t pass, build fails), the pipeline stops, and the change never reaches production.
Here’s a GitHub Actions workflow:
# .github/workflows/deploy.yml
name: Build and Deploy Evaluation Service
on:
  push:
    branches: [main]
jobs:
  build:
    runs-on: ubuntu-latest
    steps:
      - uses: actions/checkout@v3
      - name: Build Docker Image
        run: docker build -t evaluation-service:latest .
      - name: Run Tests
        run: pytest tests/
      - name: Push to Registry
        run: docker push myregistry/evaluation-service:latest
  deploy:
    needs: build
    runs-on: ubuntu-latest
    steps:
      - name: Deploy to Kubernetes
        run: kubectl set image deployment/evaluation-service evaluator=myregistry/evaluation-service:latest
The hidden complexity: CI/CD pipelines for agent systems need evaluation gates. You shouldn’t auto-deploy a new agent version without running it through a test suite that checks response quality, latency, and safety — LangFuse evaluations can catch regressions before they hit production.
Helm Charts: Reusable Configuration Blueprints
Helm Charts are package managers for Kubernetes — they bundle all your Kubernetes manifests (deployments, services, config maps) into a single, versioned, reusable package. Think of it as a IKEA instruction booklet — it gives you a blueprint for assembling the furniture, but you can customize the color and dimensions.
Under the hood, Helm uses Go template syntax to make your configuration dynamic. Instead of hardcoding image tags or replica counts, you define variables in a values.yaml file, and Helm substitutes them during deployment.
Here’s a snippet from a Helm chart for our microservice:
# values.yaml — customize without editing the template
replicaCount: 3
image:
  repository: myregistry/evaluation-service
  tag: latest
  pullPolicy: Always
resources:
  limits:
    memory: "512Mi"
    cpu: "500m"
  requests:
    memory: "256Mi"
    cpu: "250m"
service:
  port: 5002
The subtlety: Helm charts can become versioned landmines if you don’t manage them carefully. Always pin chart versions in your deployment pipeline, and never use latest tags in production — specify exact semver versions to guarantee reproducibility.
Autoscaling: Your System That Adjusts Itself
Autoscaling automatically adjusts the number of running containers based on real-time metrics like CPU usage, memory consumption, or request latency. Think of it as a smart thermostat — it measures the room temperature and adjusts the heating or cooling to maintain a comfortable level.
Under the hood, Kubernetes Horizontal Pod Autoscaler (HPA) monitors metrics and adjusts the replicas field in your deployment. It polls metrics every 15 seconds and can scale up within seconds, but scales down more slowly to avoid thrashing.
Here’s an autoscaling configuration:
apiVersion: autoscaling/v2
kind: HorizontalPodAutoscaler
metadata:
  name: evaluation-service-hpa
spec:
  scaleTargetRef:
    kind: Deployment
    name: evaluation-service
  minReplicas: 2
  maxReplicas: 10
  metrics:
  - type: Resource
    resource:
      name: cpu
      target:
        type: Utilization
        averageUtilization: 70
The critical insight: autoscaling on CPU alone is insufficient for agent systems. Your LLM inference service might be I/O bound (waiting for API responses) rather than CPU bound. Consider custom metrics based on request queue depth or latency from LangFuse traces to trigger scaling more intelligently.
Comparison Table: How These Concepts Work Together
| Concept | Role | Key Question It Answers | Typical Tool |
|---|---|---|---|
| Production DevOps | Philosophy & process | How do we ship reliably, fast? | Culture + automation |
| Containerized Microservices | Architecture pattern | How do we split our system? | Docker |
| Kubernetes | Orchestration platform | How do we run and manage containers? | Kubernetes |
| Docker Images | Packaging format | How do we ship our code? | Docker |
| Helm Charts | Configuration management | How do we deploy consistently? | Helm |
| CI/CD Pipelines | Automation | How do we get changes to production? | GitHub Actions |
| Autoscaling | Resource management | How do we handle variable load? | HPA |
Key Takeaways
- Production DevOps: Automates and operationalizes your development practices to reduce deployment time and increase reliability
- Containerized Microservices: Break your agent into independent services, each with a single responsibility, packaged in containers
- Kubernetes: Orchestrates containers to maintain desired state and handle failures automatically
- Docker Images: Standardized executable packages that make deployment consistent across environments
- Helm Charts: Reusable, versionable configuration blueprints for Kubernetes deployments
- CI/CD Pipelines: Automated build-test-deploy workflows that catch issues before they reach production
- Autoscaling: Dynamic resource adjustment based on real-time metrics — crucial for handling unpredictable LLM traffic patterns

Comments